Showing posts with label New Cam System. Show all posts

Wednesday, 26 December 2012

The Bartlett Tendon - Settings

I've now been using my new Bartlett Tendon for a good few weeks now so thought I'd write a little more on how things are going.

 Also add a little bit about some of the settings which I got from Brian Bartlett the knees designer.


Well first off I have to say this knee is amazing...No I'm not just saying that as I'm sponsored on the unit. Brian always requests that I be honest with him when trying out his designs as this feedback then goes on to help improve on future models. The knee is amazing in what it allows you to do as an above knee amputee. I'm now trialling the new "cam" top end on my knee and have found things have just got even better.


A lot of time and hard work has gone into making the knee work and feel something like a leg someone has lost. By work and feel I mean in it's action. With the new "cam" the movement is now smoother, with a more progressive feel (the further you flex the knee the more resistance can be felt). Instead of using a combo of hard and soft tendons, you can now leave the 2 soft tendons in place and choose how much resistance you would like by removing the "cam" locking pins and placing them in positions 1 to 3 on each "cam". Or even leaving the locking pin out completely giving you the least amount of resistance.

Here's an idea of the settings... 


The new knee is basically the same knee but with a cam instead of a wheel for the Tendons.  This will give you a softer engagement feel  to the start of your knee bend but start to ramp up into a stiffer feel towards the deeper part of the bend in the knee, this feel is also adjustable as you have four positions on each side of the knee to adjust the cam into. 
 
Here is how it works: As described by Brian Bartlett the designer of the Bartlett Tendon.
 
Position 1)  No locking pin inserted leaves the cam in the least amount of flex for the tendon and does not engage the tendon as you flex the knee because you have disengaged the locking pin; great position for road riding, snorkeling/ diving or just about anything you want to have as little tension as you can but still have something there in the end.
 
Position 2)  Top hole engaged with locking pin inserted will give you cam engagement into the tendon as the knee bends but not a lot of cam effect as for sports or applications you want to have some more tension but not enough to work against you; sports like XC skiing, road biking, XC mountain biking, SUP and any others that feel good to the users.
 
Position 3)  Middle hole in the cam engaged by locking pin inserted allowing the cam to come into the tendon more putting more pressure against it giving the user a stiffer feel at the deeper part of the knee bend;  I like this position for XC mountain biking as I have my seat up high in that application and the stiffness comes on right where I want it to as I am biking in about the 90 degree knee bend position as if I had my seat lower on the bike it might be a tad to much tension; again a lot of the same sports can apply here just depending on the users preference due to limb length and tension desired for application; Alpine skiing, snow boarding, Ice hockey, etc.
 
Position 4)  Bottom hole in the cam engaged by locking pin inserted will give you the most cam effect of Tendon tension as the knee bends moving the cam into the tendon, this will be great for DH riding, motocross, things where you want to really bend into the knee with a lot of pressure in the bottom half of the bend.
 
Here is the kicker though because you get an incredible feel to all these adjustments in the cam but these have all been tested with no air in the shock in which you'll find by just adjusting the shock a bit gives you even more tension if desired.  The next part is also that the cam is adjustable independently on each side allowing a user to adjust the cam on the right side say to hole position four and then on the left side put the cam into hole position 2 which gives a combination of tension that gives you the most natural feel for that application......you have more than twenty different ways to configure this cam for a desired cam effect.....crazy huh.
 
Also if you change the stop bushing diameter this will adjust the cam feel also as the knee will come back further in its neutral position as I like the big(15 degree) bushing in when I am utilizing the knee.

Sunday, 2 December 2012

A short ride out...wow it's chilly

As I didn't manage to get out for a ride yesterday I thought I'd go for a short blast today. I didn't intend on going far so left my Camelbak and just took along my digi-camera and mobile (always carry my phone just in case).

WoW was it a bit brisk outside, soon got warmed up though and then as I heated up tried a few sprints out the saddle on my Bartlett Tendon. I had to be canny careful today as there was so much ice around I managed to slip n slide a few times but lucky never came a cropper today. I just love the sound of the crisp leaves beneath my tyres and the crunching of the ice as you go over frozen puddles lol.

Crunch!!!!

As I wasn't going far I thought I may as well take in at least one or 2  assents, it's to good to push yourself and get out of breath,means your working hard and helps keep your fitness up.Plus as I am running my BT on the number 2 position on both of the "cams" well it's a little more difficult as there is  slightly  more tension on my tendons. It will be interesting to see how much my muscles grow on my stump side whilst using this new BT and "cam".

Position 2 on the "Cam" see the like "grenade pin" lol
 I didn't get too many pics today, it's real difficult when your out on your todd. You set your camera To "auto" then try to do a drive by and capture it just right in time with the "Beep Beep Beep" of your camera. Never mind I did get a few which aren't total failures I guess.

Camera set to auto "just click dam you"

On my way home I decided to venture up South Moor bank (instead of taking a slightly easier flatter way home). I thought I'd change it up a bit and pop my bike into 1 gear higher and then ride one lamp-post to another seated, then one lamp-post to another out the saddle and pumping. I know to those who ride a bike normally, (by that I mean with 2 legs) it doesn't sound much, but as an above knee amputee riding up a hill out the saddle is quite a feat. I mean if it wasn't for this amazing knee I couldn't even ride out the saddle on the flat, never mind up an incline. So as I reached the top of the bank I was pretty chuffed and it was another gold star for the Bartlett Tendon. I mean yeah I could do it with the old BT, it was just a lot harder work. Brian has managed to move the technology along with the design of the "cam" and now the knee feels a lot more supportive the more the knee is flexed, this means you use less energy and instead of having to swap tendons out ie a choice between 2x softs or 2x hards or a soft/hard combo, you can now leave the 2x softs in and allow the "cams" to do the work. All you have to do is remove a simple pin on each side, pop the "cam" in one of the three pre-set positions depending on how much tension you would like going through each of the tenons and that's it your done. Oh and depending on what sporting activity your doing and if you require it you can also pump up the new RockShox Monarch RT3 and adjust the compression/rebound settings.

My Sandman

Sunday, 25 November 2012

My first go on my new Bartlett Tendon, fitted with the "Cam" system...


Hi there...

Well this morning I got up, yeah rather late I mean come on I'm not used to these early starts and since getting my voluntary job at the hospital well I've been up around 7'ish every morning. So I thought I was entitled to a lie in.

I had planned to remove my old Bartlett Tendon knee and replace it with my new one, however my dad beat me to it as I got caught chatting to a friendly neighbour who was passing. My dad decided to sort the knee/socket indoors as it was a bit cold outside. So I was able to give him a bit of a hand and I did the final adjustments and tightening of the required bolts, aligned the knee and just made sure everything was as it should be. Oh I also swapped out the larger plastic bump stops (think that's what they are called. I'm not good with all the technical terms lol) and replaced these with the smaller ones Brian had supplied as I'm more accustomed to not having a slight flex in my knee. Basically if you have the larger stops in, it helps you bend the knee easier as it is already partly flexed.

It was then a case of changing my shorts and popping my SPD shoes on and going for a quick blast up and down our back street.

If you checkout my earlier photo's you can clearly see the different adjustment holes marked by dots on the side of each "cams"

I left the locking pins that go through the "cams" in position one (1 dot) to start with and had a ride up and down a few times. In terms of resistance I would probably say it's like running the 2 soft tendons with no pressure in the shock on the Original designed wheels. I did feel slightly more resistance the further I flexed the knee and that is the intended purpose of the "cams"

From there I decided to relocate both pins into the position two ( 2 dots) WoW now I could tell immediately the difference. At the top end of the stroke when cycling and the knee is not in full flexion there is minimal resistance, however when you go to flex the knee you can really feel the tendons becoming stiffer and a lot more resistance. From a mountain biker point of view this is brilliant as it means you can hang off the back of your seat and really use the tension in the tendons to help you take jumps, bumps and drops. I'm sure from other sporting perspectives the knee will be just as good.

So after my initial bit play up and down our back street I thought it would be a good idea to have a look out and decided to go over to some woods about 4 or 5 miles away. I cheated slightly as time was getting on so got my dad to drop me off in the car along with my Sandman Fat Bike and all my gear. I intended to get a little bit footag but was worried as the weather looked a bit bleak, it was dark and dull and ever so cold.

We arrived at the woods and like I say it was real cold, the trails where actually frozen in places and you could see the mist hanging and frost on the grass....brrrrrr!!!. Never mind I was on a mission to try out my new knee and have a bit of fun. Plus I had to do something otherwise I wouldn't have anything to write for you nice people, see your my motivation lol.

Anyhoo I got a little bit of ride footage, hope you like it. I will definitely be getting more, could do with better close ups of the knee. I actually found it hard to ride over in the woods as there was just so much thick deep mud. I could do with a new back tyre to be honest as my Surly Larry isn't gripping. Looks like I'll have to save for a Nate.

On the ride back home I was thinking about what I was going to write in my blog about the new Bartlett Tendon and for some reason Goldilocks sprang to mind. Let me explain... well as we all know Goldilocks apart from being a thief actually tried out all of the 3 bears bowls of porridge, until she found a one that was "Just Right" and in that respect the Bartlett Tendon with the new "cams" is exactly the same. You see each individual can adjust and tweak the knee unit to suit themselves and for whatever sport they intend on doing.

I'm very impressed with my first outing, even if I was freezing cold by the time I got in.


Me and the New BT with "Cams"

 
My Sandman


Saturday, 24 November 2012

New Bartlett Tendon has arrived

Further to my last post saying I was awaiting the arrival of my new Bartlett Tendon (sporting prosthetic knee) well fantastic news it's arrived.

I managed to  take a few shots last night after I got it home from the UPS delivery office, sorry they aren't exactly mint images, just it was dark in our dinning room and for some reason my camera didn't want to focus on the unit on anything less than an 800 iso setting (hence the grainy appearance). Never mind it gives those of you interested in anything prosthetical (if that is even a word lol) or if you appreciate design, craftsmanship, engineering and the amount of hard work the designer Mr Brian Bartlett has put into this awesome prosthetic device.

So lets have a look at a few pics huh?

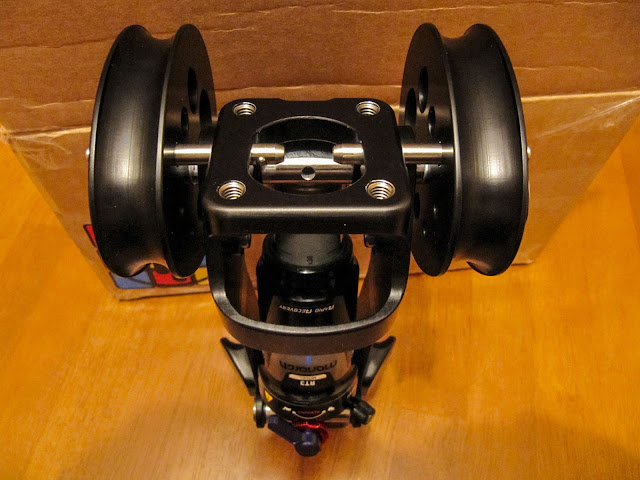
The Bartlett Tendon with new "cam" system
Notice there are 3 settings which can be chosen on either "Cam" this is so the tendons can work in different stages of tautness and effect just how much stiffness can be applied to the knee unit.


Still in the box, the Bartlett Tendon, with "Cam" system

Checkout the new RockShox Monarch RT3


Notice the 2 locking pins which go through the "Cams" and lock them in position

One of the locking pins removed from the "Cam"


The 2 locking pins in place through the "Cams"

Anyhoo prepare yourself for the next instalment when I will be fitting my new BT to my Pace Rehabilitation  provided socket  and getting some riding footage, along with a few photo's of me in action . Oh and also doing a little bit of a piece on how the knee works and feels to ride with.

Huge thanks goto 

LEFTSIDE INC

PACE REHABILITATION

For their on going support...